This is a traditional version ,learned from my grandma. She used to mash the keerai in the mud pot ,which gives a real taste .But now in modern days we use mixie or food processor to mash spinach that results in a little difference in taste. Here’s my method that gives more or less the same texture and taste as my grandma’s.


Ingredients:
- Spinach – 1 bunch ( I used baby spinach (Paalak Keerai) )----(U can try sirukeerai or araikeerai if u can get from Indian stores )
- ½ cup split green gram dal ( Siru paruppu / pasiparuppu )
- 5 Garlic gloves - Peeled & roughly crushed
- 15 Onion shallots ( or ½ red onion ) – peeled & chopped smaller
- 5-6 green chillies ( Thai chilli)
- 1 Red chilli dry ( for seasoning)
- 1 big size tomato
- Few Tamarind pieces (Or u can add few drops of tamarind paste )
- Salt to taste
- Water ( as required)
- 1 pinch of turmeric powder
- 1 pinch of asafoetida powder
- 3 tsp –Cumin seeds
- 1 tsp – mustard seeds
- Few Curry leaves

Procedure:
This is a 3 step process.
First is to cook dal & spinach
Second is to make onion ,tomato paste
Third is to mash & Seasoning
- Take a heavy bottomed pan and add the dal, 1 tsp of cumin and fry it dry for 2 mins in medium flame until it gets a nice flavor – U can see the shining color of the dal.

- Then add 1 1/2 cup of water, pinch of turmeric powder, asafetida powder and 2 garlic crushed and set the flame to high. Let it boil for 10 mins. (stir dal & cook uncover )

- Meanwhile take the spinach and wash it under water and drain and cut in to medium pieces.
- If u r using siru keerai /araikeerai, U may go for additional procedure of separating leaves and tender stems and then wash it thoroughly and drain the spinach. And now cut the spinach roughly in to medium pieces. (Don’t wash the spinach after u cut it, that will lose some of its minerals & vitamins.)
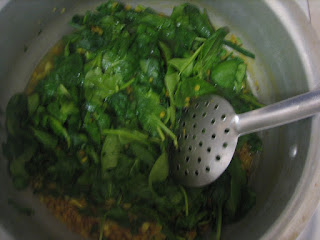
- Once ur dal is half done, (after the water in the dal is absorbed and dal quantity increased) add the spinach to it and sprinkle some water to cook. Cover the pan with lid and simmer the flame for 5-7 mins. Check for the water in between and sprinkle some more water if u need . (Don’t pour water ,b’coz u’ll get water from the spinach while cooking and also salt naturally )


- Now take other fry pan with 2 tsp oil and add green chilles chopped , and then onion shallots chopped ( leave 2tsp of chopped onion for tempering) fry it until the colour changes - that will take not more than 5 mins ( if u r using red onion it will take few more mins to cook )
- Then add chopped tomatoes to it and add salt, and close lid for a while to get ur tomatoes mashed and turn off .


- The spinach cooking with dal will be done at this time. Check the spinach piece by mashing it with ur fingers, if the stem is so soft and getting mashed easily ,then its done. Note that the color of the spinach should not change.( The change of color indicates that u had overcook it) Now add the fried onion,tomato mixture to it and leave it for 2 mins on stove and turn off. Transfer the content to a wide mouthed bowl to cool or place under the fan .


- Take the biggest mixie jar and transfer the keerai with the tamarind. Start the mixie in pulse mode (0) for only a few(1-2) seconds. U can see the dal &spinach are getting mashed and resulting a greenish pale yellow gravy. We use mud pot to mash the keerai in our home(India).

- Now the time for seasoning..,add few drops of oil in a fry pan and add mustard seeds,once it gets popped,add the cumin seeds ,remaining crushed garlic and chopped onions and curry leaves and a red chilli. After 2 mins u can get ur seasoning ready ,and pour it to the keerai masiyal .

No comments:
Post a Comment